Products Suggestions:

Products suggessions:

We use cookies to provide you with a great user experience. By using our site, you accept our use of cookies . You can review our cookie and privacy policy here.

On the Cutting Edge: Cat Dissection

Compiled by Tammy Sadler
Preserved Materials Department

The Carolina’s Perfect Solution® cat is an excellent dissection specimen for giving students the “inside story,” allowing them to see firsthand how feline anatomy closely parallels human anatomy. Dissection of this large vertebrate using comparative anatomy techniques is an effective stepping stone to teaching human anatomy. Here are hands-on dissection activities that help students understand the cat’s external and internal anatomy and their connection to human anatomy.

Making the connection

As you explore the external structures and internal tissues, organs, and systems of the cat, consider the similarities and differences between humans and cats.

External anatomy—getting started

Have your students explore their specimen’s external anatomy using the following procedure:

  1. Don lab apron or coat, gloves, and eye protection.
  2. Place the specimen in a dissecting tray and identify features that are evolutionary characteristics that identify it as a mammal.
  3. Locate and examine the following structures:
    • Head, including eyes and eyelids; pinnae (external ear structures); mouth; nares (nostrils); philtrum (cleft in upper lip); and vibrissae (long, stiff hairs around the mouth, cheeks, and eyes)
    • Neck
    • Trunk, including mammillary papillae (teats); anus; urogenital opening or scrotum and penis; and tail
    • Forelimbs, including shoulders; elbows; wrists; feet; toes; claws; and tori (foot pads)
    • Hind limbs, including hips; knees; ankles; feet; toes; claws; and tori (foot pads)
  4. Separate the upper and lower eyelids. Locate and examine the third eyelid, the nictitating membrane.
  5. At this point, you may want to lead a discussion about these external features, why they are important, and how they compare to humans. It may be useful to have students draw Venn diagrams in their science notebooks, comparing cats and humans.
  6. Return the specimen to storage or proceed with internal dissection as time permits.

Click on image to enlarge.


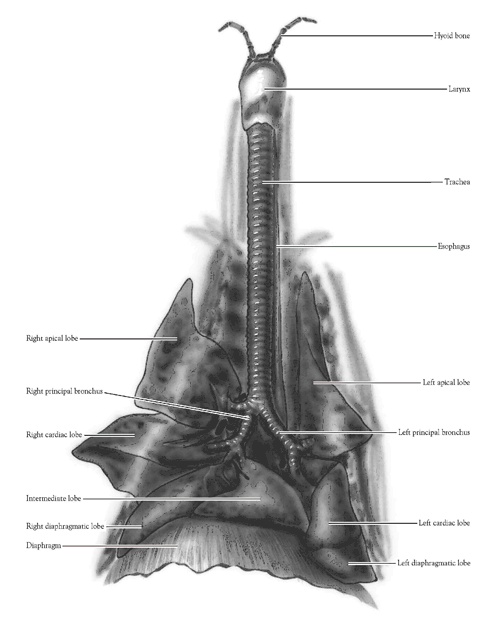
Internal anatomy—exploring the “inside story”

Now your students can begin to explore the internal anatomy of their cat specimen to further study the tissues, organs, and systems. A full dissection would include all of the major systems, including the muscular, digestive, urogenital, circulatory, respiratory, nervous, and skeletal systems.

Here are activities relating to the digestive and respiratory systems that you may choose to perform during your next cat dissection.

Digestive system dissection activity

  1. Don lab apron or coat, gloves, and eye protection.
  2. Using bone-cutting forceps, cut the bones at the corners of the jaw until there is a clear view of the interior of the mouth.
  3. Refer to Fig. 1. Use it to help you locate and identify the structures on your specimen.
  4. Next, locate the posterior end of the sternum. Lift the abdominal muscle just posterior to the sternum and cut through the muscle and into the abdominal cavity.
  5. Insert the blunt tip of the scissors into the cut and make an incision from just to one side of the midventral line to the posterior end of the abdominal cavity. Use Fig. 2 as a guide.
  6. 200
    Click on image to enlarge.
  7. At the anterior end of the incision, make lateral cuts following the posterior margin of the ribs. Make lateral cuts through the body wall at the posterior end of the abdominal cavity. Note: Be careful. Male cats have cords that run from the posterior abdomen along the surface of the thigh muscles to the scrotum. Try to leave these cords undamaged.
  8. Fold back the lateral body wall. The membrane covering the abdominal digestive organs is called the greater omentum. Carefully remove the membrane and locate the digestive organs. If you find a dark brown substance coating the abdominal organs, blood has leaked into the abdomen and must be flushed out. Rinse the abdomen carefully with water for several minutes until the cavity is clean.
  9. Pin each side of the abdominal wall to the dissection tray, or trim it out of the way. This will give you a clear view of the interior of the abdomen.
  10. Using bone-cutting forceps or heavy scissors, cut each rib about 1 cm to either side of the sternum.
  11. Once all the ribs have been cut, lift the sternum. Hold the sternum in place while you cut the underlying membranes.
  12. Remove the sternum.
  13. Cut or break the ribs along the sides of the chest, near the attachment to the vertebrae, to expose the thoracic cavity.
  14. Refer to Fig. 3. Use it to help you locate and identify the structures on your specimen.
  15. Cut the body of the stomach and examine the interior body wall. Cut the pyloric stomach section to examine the sphincter muscle that controls the passage of food from the stomach to the small intestine.
  16. Click on image to enlarge.
  17. Remove a small section of the small intestine. Examine the interior wall.
  18. Remove a small section of the large intestine. Examine the interior wall and compare it to the interior wall of the small intestine. If you have access to a stereomicroscope, view each section of intestine under magnification.

Digestive system dissection activity

  1. Don lab apron or coat, gloves, and eye protection.
  2. Clear away muscle that obscures the trachea, larynx, and hyoid bone.
  3. Locate the structures shown in Fig. 4.
  4. Make a thin slice through the lobe of a lung and observe it under a stereomicroscope.
  5. Once the respiratory system has been thoroughly studied, expose the esophagus from the pharynx to the stomach. Review the portion of the digestive system between the head and abdominal region.
  6. Click on image to enlarge.

Structure and function overview

After each system has been properly dissected, spend time with your students identifying major organs and discussing structure and function. You may also choose to discuss the similarities between cats and humans and highlight such things as the arrangement of organs in the body cavity, the 4-chambered mammalian heart, or the similarities in musculature.

Extend students’ study of mammalian anatomy

Two of our most popular cat anatomy dissection kits are excellent resources for examining and studying all the systems in the cat. The Cat Dissection BioKit® helps students understand basic feline anatomy and physiology through guided dissection. It includes 15 plain Carolina’s Perfect Solution® cats, storage bags, and detailed lab manuals. The AP® Biology Mammalian Structure and Function Dissection Kit provides a comprehensive survey of tissues, organs, and organ systems. It also includes 15 plain Carolina’s Perfect Solution® cats, storage bags, and detailed lab manuals. An added bonus is the set of 25 slides representing major tissue types.

Learn more

To learn more about our extensive selection of dissection kits for the classroom and Carolina’s Perfect Solution® specimens, visit www.carolina.com/preserved, where you can also find secure online shopping, product information, classroom resources, activities, and additional teaching tips.