My Cart
Your Shopping Cart is currently empty. Use Quick Order or Search to quickly add items to your order!
By Susan Lustig
Carolina Teaching Partner

Moviemakers know the value of booms and bangs. Imagine Die Hard without an exploding skyscraper. Action flicks with mega explosions often become blockbusters, attracting millions of fans. You can use the same technique-on a much smaller scale, of course-to interest your students in learning about chemical reactions and answer their first-of-the-year question, "When are you going to do some cool stuff?"
My favorite part of teaching chemistry is the booms and bangs. The theatrics impress students, but, for teachers, they are tools that enhance the learning experience. Getting students to see the science behind the spectacle starts with knowing your objective when performing a demonstration (demo). Even though demos are the fun part of the class, science is the priority with theatrics secondary.
Use the 5E learning cycle-engage, explore, explain, extend, and evaluate-to create a framework that enables students to use the wizardry of chemistry to reinforce the concepts being taught. It is important that students record the demonstration with explanation, observations, and diagrams. Making students accountable for explaining what they see ensures that the demo is a teaching tool with more than just "WOW" effect.
Below is an example of how I incorporate these concepts using a favorite classroom demonstration to show the properties of hydrogen and oxygen gases. When you do this demo, remind your class that highly paid experts create special effects for cinema and television, and they probably started learning their craft in a chemistry class like this one.
Clearly state the objective of the lesson: To be able to identify and differentiate the properties of elements, compounds, and mixtures.
Note: Take safety precautions. Wear safety goggles and gear to protect your ears from loud sounds. Place a shield in front of the balloons. I use a Plexiglas® shield that is standard equipment in most labs. Instruct students to keep their ears covered while you apply the flame to the H2 and the H2 + O2 balloons.
| Balloon | Substance | Element, Compound, or Mixture? |
Initial Observation | What Occurs (when lit) |
Explanation | Reaction (word equation) |
Chemical Equation |
| #1 | |||||||
| #2 | |||||||
| #3 | |||||||
| #4 |
Questions could include:
You can give students a follow-up assignment to expand the concept. Have students compare 2 other elements, such as sodium and chlorine, with the compound they form. Sodium chloride (table salt, the white solid that we eat) has properties unlike sodium (highly reactive silver solid) and chlorine (a poisonous gas). You can also show the reactivity of sodium metal in water using safety procedures under a hood. The sodium bursts into flame when introduced to water and creates a small boom.
You can take another approach to combine an activity and a written lesson by using a fish tank demo of equilibrium. Predicting the outcome and changing the variables in an experiment are skills that science students need. In this demo students will make predictions based on changing the variables in an experiment.
Objective: To show that "equilibrium" means constant rate, NOT equal amounts, and how a stress can change equilibrium.
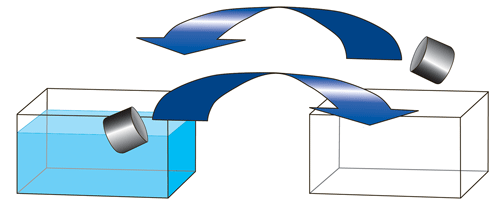
Prepare 2 identical fish tanks. Label the first tank #1 and leave it empty. Label the second tank #2 and fill it ¾ full of water tinted with food coloring. The color used doesn't matter; tinting just makes the water visible. Note: Explain the demo and have students record their predictions of its outcome before scooping starts. Instruct 2 students to simultaneously scoop water from both tanks using equal sized beakers. One student scoops from tank #1 and dumps into tank #2 while the other student scoops from tank #2 and dumps into tank #1. Students repeat this process until the water level in both tanks remains constant (see Fig. 2).
Figure 2. Scoop the water back and forth between tanks.

The expected observations are that initially no water is removed from tank #1, but after many scoops, equilibrium occurs. Then both tanks remain at constant water levels, although with unequal volumes of water (see Fig. 3).
Figure 3. Water in tank #1 and tank #2 (respectively) at equilibrium.

Once the tanks are at equilibrium, have students describe how equilibrium occurred and what the term means. They can then brainstorm and determine how to stress the system (such as varying beaker sizes or scooping speed) and predict the outcomes. Require students to record their predictions and the demo's actual results. Expanding the topic could include having students predict the outcome of adding various stresses to the system.
The key to making demonstrations meaningful for students is preparation! You also must be comfortable with the science and understand the relationship between the "show" and the subject. Again, it is important, as teachers, to remember the demonstration is for teaching, not just entertaining. Clearly state the objective, and ensure that students reinforce the science of the demonstration with a writing assignment that includes describing and explaining the WOW.