
My Cart
Your Shopping Cart is currently empty. Use Quick Order or Search to quickly add items to your order!
Whether you’re teaching college-level anatomy and physiology, an advanced high school anatomy course, or a basic biology course, cat dissection is one of the best ways to help your students understand mammalian musculature. While formalin-preserved cats have long been the standard for mammalian dissection, we highly recommend Carolina’s Perfect Solution® cats for your next dissection lesson. We’ll explain why, and then show you how to remove a specimen’s skin and give you some tips for studying mammalian musculature.
Carolina’s Perfect Solution® provides slow-firming action that gives specimens more lifelike tissues and organs with natural vivid colors and texture without the strong odors associated with formalin specimens. Teachers and students who have worked with Carolina’s Perfect Solution® specimens are consistently impressed with what they have seen and experienced. Here’s what anatomy instructor Patricia L. Kapkau of Whittemore-Prescott High School in Whittemore, MI, has to say:
The muscular system is easy to study using Carolina’s Perfect Solution® cats because with Perfect Solution the tissue is so pliable and realistic in color. It is easy to see striations and easy to work with the different muscle layers. I think the cat is a great specimen for muscle study as the muscles are well developed and are so similar to human anatomy.
How to remove a specimen’s skin
To begin studying muscle tissues, your students must first remove the specimen’s skin. If time is an issue, consider purchasing cats with their skin already removed so students can get right to work on actual muscle study. We offer Carolina’s Perfect Solution® Skinned Cats in several different sizes and injection types.
However, if time’s not an issue, it’s not difficult for students to remove a specimen’s skin themselves. Allow students at least one lab period for the task. Equipment needed includes forceps, scissors, and a blunt probe (not a needle). The blunt end of a scalpel handle can be used as a probe if the blade is first removed. Otherwise, do not use the scalpel for skin removal as it can damage the specimen. OK, let’s get started.
Place the cat on its back. There should be a cut in its neck where the blood vessels were injected. Beginning at the cut, lift the skin with forceps, insert the blunt tip of your scissors, and cut forward to the chin (see Fig. 1).

Figure
1
Notice that a white, fibrous tissue, the superficial fascia, connects the skin to the underlying tan-colored muscles. Extend the cut posteriorly along the ventral midline to the external genitalia. Cut around the genitalia, the anus, and the base of the tail. Extend the cut down each limb and around each wrist just before the paw. Also cut around the mouth to the eyes and around the eyes and ears. As you cut the skin, lift it up and use the blunt probe to separate the skin from the muscle (many teachers recommend using the handle of the scissors to separate the skin from the fascia, see Fig. 2).

In some places you may have to use the scissors to get the skin to separate properly. Work with the tip of the probe or scissors against the skin rather than against the muscles (see Fig. 3). This will prevent damage to the muscles. Remove the skin as a whole piece rather than cutting it into bits. Use the scissors to cut the mammary glands from the skin as close to the nipples as possible.

Figure 3
As you skin the thorax, you will find the cutaneous maximus, the cutaneous muscle that twitches the skin. In the neck area is a second cutaneous muscle, the platysma. It’s almost impossible to remove the skin without damaging these muscles, and they must be removed before the skeletal muscles can be studied. However, because of the danger of tearing a deeper muscle, try to leave the cutaneous muscles intact for now.
Many teachers agree that the best way to approach muscles is by understanding the criteria used in naming individual skeletal muscles. Location of the muscle, shape of the muscle, relative size of the muscle, direction and orientation of the muscle fibers or cells, number of origins, location of the attachments, and action of the muscle are the main criteria that help in identifying the muscle. The number of muscles students must learn depends on your class’s skill level, background knowledge, and course requirements.
Because the muscles are covered and held tightly together by connective tissue, dissecting them requires slow, patient, careful work. Use forceps, blunt probe, and scissors to remove the fat and connective tissue covering the muscles and to separate the belly of each muscle from its neighbors. Your students may need diagrams and/or models to help them identify specific muscles. It may be difficult to find the separation between 2 adjacent muscles. If so, use caution or you may “create” a muscle. It’s generally better to begin at the origin or insertion and work toward the belly.
It’ll be necessary to transect and reflect (fold back) superficial muscles to expose deeper muscles (see Fig. 4). This is accomplished by cutting through the belly of the superficial muscle and reflecting its cut halves towards the muscle’s origin and insertion, respectively. The superficial muscles can then be replaced for review or further study. We recommend that deep muscle dissection be done on the left side only. Then, in case of a major error, the right side will still be available. This will also leave the right-side blood vessels and nerves intact for later dissection.
Once the muscles are well exposed, trace their origins and insertions. Refer to an articulated skeleton and muscle diagrams when studying origins and insertions. The muscle actions listed in our dissection manuals are based only on the contraction of the single muscle under consideration. Actually, a muscle usually works with other muscles to produce other actions in addition to those listed. It will be helpful to think of how groups of muscles move a joint or limb.
Figures 4, 5, 6, and 7 show muscle identification using Carolina’s Perfect Solution® cats. Notice the lifelike tissues with natural vivid colors and texture.

Figure 4

Figure 5
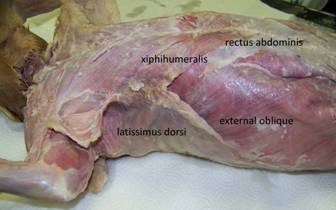

Figure 7
Use our detailed AP® Biology Mammalian Structure and Function Dissection Kit to teach your high school or college students about mammalian structure, including muscle groups. The complete kit provides materials for a class of 30. Working in pairs, students complete a comprehensive survey of muscles, tissues, organs, and organ systems using the cat as a model organism. The Introductory Histology Set included in the kit contains 25 slides representing major tissue types and is ideal for additional lab extension activities.
The kit also includes 15 plain Carolina’s Perfect Solution® cats—preserved and shipped in our unique, proprietary formula that creates a superior, more natural-looking specimen, 15 plastic storage bags, waterproof student name tags, a teacher’s manual with reproducible student sheets and Carolina™ Bioreview® sheets, and the highly detailed Dissection of the Cat laboratory manual that includes musculature diagrams for reference.
To learn more about our extensive selection of dissection kits for the classroom and Carolina’s Perfect Solution® specimens, visit www.carolina.com/preserved, where you can also find secure online shopping, product information, classroom resources, activities, and additional teaching tips.