My Cart
Your Shopping Cart is currently empty. Use Quick Order or Search to quickly add items to your order!
 Jen Black
Chemistry Product Manager
October 2015
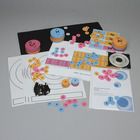
Learning chemistry often requires students to imagine and visualize structures and reactions on particulate and sub-particulate levels. This can be difficult for many students, particularly those who learn best in a visual or tactile way. Chemistry manipulatives can be a great solution for students to study chemistry concepts that require them to “see” the structure or process to fully understand it.
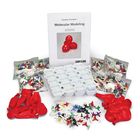
The Bohr model of the atom continues to be a useful way for students to learn the basic tenets of atomic theory before they move into the more challenging aspects of quantum mechanics. The Bohr model can be successfully taught using simple manipulatives.
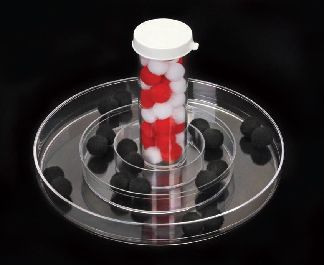 Each color of pom-pom represents a different type of subatomic particle—protons, neutrons, and electrons. The plastic tube represents the nucleus. If the cap is on, the nucleus is stable. If the cap is off, the nucleus is unstable. The petri dishes represent orbitals in the electron cloud.
Elements up to atomic number 18 are represented by placing the appropriate number of proton pom-poms and neutron pom-poms in the plastic tube “nucleus.” Then the appropriate number of electron pom-poms is placed in each petri dish “electron shell,” starting with the smallest petri dish with a maximum of 2 electrons, and ending with the largest petri dish with a maximum of 8 electrons.
Activities for the Bohr model of the atom include:
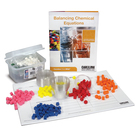
Manipulatives are a great way to make sure students understand the principles of the law of conservation of mass. When students can “see” the number of atoms participating in each side of a chemical reaction, they are more likely to understand the difference between subscripts and coefficients and to correctly balance equations.
Separate the chips or cubes into different colors, where each color represents a specific type of atom. On the dry-erase mat, draw a work area similar to the figure below. Write the reactants and products of the equation to be balanced on the lines above the boxes, leaving empty space for coefficients. Assign a color to each type of atom in the equation and write the symbol for the atom beside the assigned color on both sides of the reaction. Group the chips or cubes into molecules according to the equation and using the assigned colors, then place them into their boxes on the dry-erase mat. Students will use a balancing equations process to make additional molecules if necessary and to determine the coefficients required for each molecule.